How to Beat the Dark Heart in Paradox Junction (Black Ops 7)
Black Ops 7 Zombies Season 2 Reloaded brings Paradox Junction, a new map with a challenging boss fight. Unlike Ashes of the Damned’s Veytharion and Astra Malorum’s Caltheris, the Dark Heart in Paradox Junction has more mechanics involved when it comes to activating its damage phase.
Below, you’ll find a full loadout to use against Paradox Junction’s boss fight, from the only weapon we used to the Perks and Equipment that will become vital to your victory. We’ve also provided information on how to beat each phase, so you’re always informed on how to win.

Paradox Junction Easter Egg Walkthrough in Black Ops 7 Zombies
Here’s a complete guide to the Paradox Junction main easter egg quest in Black Ops 7 Zombies, complete with all steps, locations, and tips.
Best Weapon & Ammo Mod for Paradox Junction Boss Fight

- We recommend the M34 Novaline.
- Pair the Novaline with Brain Rot (Ammo Mod)
- Weapon ID Code: M03-21WSP-DGAE5-Q911
- The M34 Novaline is a Marksman Rifle that, when Pack-a-Punched, is full-auto and deals immense damage, especially when paired with the right Perk-a-Colas.
- This weapon is essential for the Dark Heart, as it can deal damage from any range, and its hard-hitting bullets make quick work of Rad-Hounds.
- Brain Rot is effective against Shock Mimics, and its chance to Charm zombies will relieve the pressure on you, especially in solo.
You should have the Sundergat as your secondary, purely because its special R2 move is good for clearing small hoards, but it’s not very compatible against the boss.
Best Equipment & Field Upgrade for Paradox Junction Boss Fight
The only equipment you NEED to bring is the LT53 Kazimir. This Tactical Equipment acts as a Gersh Device that will pull all zombies into its field to instantly kill them.
The LT53 Kazimir is absolutely necessary for the boss fight, as the Dark Heart has phases in which you must defend artifacts from being attacked, and the Kazimir can easily protect each area.
We also greatly recommend Aether Shroud, as this will allow you to attack the boss without being focused on by other zombies, and gives you a way to recover if you sustain too much damage.
Best Perks for Paradox Junction Boss Fight
Really, if you’re going into a boss fight, you should make sure you have all Perks (and even Eternal Perks). However, some core Perks are far more important to have than others, especially with the right Augments:
|
Perk |
Augments |
Why They’re Useful |
|---|---|---|
|
Jugger-Nog |
Iron Core Durable Plates Hardened Plates |
You’re going to get hit a lot, since this is a running battle. Ensuring you have the health to survive against all odds is essential. |
|
Vulture Aid |
Armor-Matic Picky Eater |
Armor-Matic will ensure looted Armor Plates are automatically applied to your vest so that you don’t have to focus on them. Picky Eater will give you a higher chance of getting your LT53 Kazimirs back by killing zombies. |
|
PhD Flopper |
Environmentalist |
Only the Environmentalist really matters, as this will make you immune to the Rad-Hound’s elemental explosions if you slide through them. |
|
Mule Kick |
Free Throw Fully Equipped |
Free Throw gives you a small chance to keep a thrown Kazimir. Fully Equipped means you’ll have 3 Kazimirs instead of 2, and since there are 3 defence stations to focus on, that means one per area. |
|
Double Tap |
Double Impact Double Time |
Double Impact really helps, as it gives double damage for every other successive hit on the same target. Since this boss has plenty of health and only a few weak spots, it means you can really focus fire on him. This is further aided by faster weapon fire rate with Double Time. |
|
Stamin-Up |
Guns Up Footwork |
This boss fight requires you to move a lot, especially since Rad-Hounds are faster than you. Therefore, being able to fire while sprinting to make a pathway, or while staying on the move and shooting the boss, ensures quick steps. |
Again, all Perks are important for this boss fight, but we’ve picked out the Perks and Augments that can really make a difference and ensure you have the best outgoings when it comes to survival and damage.
Best GobbleGums for Paradox Junction Boss Fight

GobbleGums are completely unnecessary, and we managed to complete the boss fight without using a single Gum. However, if you have the Gum to spare, these are what we would recommend:
|
GobbleGum |
Why It’s Useful |
|---|---|
|
Requipment |
5 Minutes of refilling equipment means you won’t have to rely on Max Ammo to throw more Kazimirs if you run out during the defense mission step. |
|
Power Keg |
If you’ve exhausted your Aether Shroud, Power Keg will recharge it instantly to ensure you have another way out if you’re in danger. |
|
Idle Eyes |
If enemies are too aggressive, pop Idle Eyes to make the defense part easier, or to make zombies useless while you focus purely on damaging the boss. |
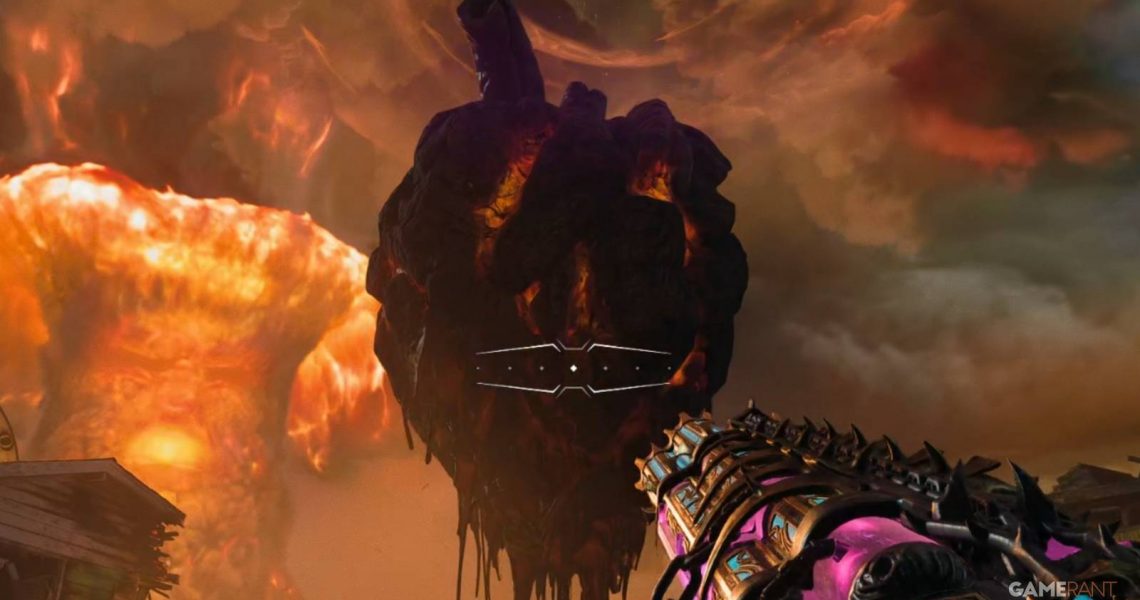
How to Beat the Paradox Junction Boss Fight (The Dark Heart)
The Dark Heart has three phases that players need to focus on, but the principles remain the same in order to actually activate the damage phase:
- Free the artifacts trapped in black goo by killing zombies near them.
- Protect the artifacts, one by one, while the Twins charge them up.
- Enter the damage phase and shoot the glowing orange cracks in the Dark Heart.
The Dark Heart Phase #1
When you spawn into the boss arena, you’ll notice that the Dark Heart is immune. Thankfully, the Dark Heart isn’t going to damage you, so ignore it for now and focus on setting up for damage.
In Trinity Avenue, Green House Backyard, and Yellow House Backyard, you’ll find three piles of goo. Kill zombies around each pile to melt them and reveal the artifacts.
Once all artifacts are revealed, a blue orb will float to one of the artifacts, and you will need to defend this artifact from zombies who will try to break the Concentration Field. After enough time has passed, the blue orb will float up and head to the next artifact, and then the final one, until all three are complete.
When in the Concentration Field phase, you should use your Kazimir. This is why Mule Kick is so important so you can have three (one for each artifact defense). You will get a Max Ammo after each damage phase.
Once all three are finished, head to the center of the map to find the Dark Heart, whose immunity will break. Your attack method should be to stay on the move, while aiming and shooting at the orange cracks in the heart with the Novaline.
Watch the ground for the Dark Heart’s explosives, and steer clear of the fire tornadoes, which will slow you down and deal damage over time.
The damage phase is not tied to time, but instead, to health. Once the health bar reaches 66%, the Dark Heart will go immune again.
The Dark Heart Phase #2
The next phase of the Dark Heart is similar to the first, with a few changes. The occasional explosive will be fired towards you, but they’re slow-moving and easy to dodge. Rad-Hounds will also spawn in this phase, and they should be the priority to kill, as they’re very fast and relentless.
Freeing the artifacts and completing the Concentration Fields remains the same, except you’ll need to shoot the yellow orb above each black goo pile to kill the purple-eyed zombies to free the artifacts instead.
The damage phase remains the same, except the Dark Heart is a bit more aggressive with its explosives and fire tornadoes. However, the Novaline continues to dominate with the right loadout we listed above, thanks to its DPS from Perks and Attachments.
The Dark Heart Phase #3
The final phase is a bit more punishing. Shock Mimics and Rad-Hounds will spawn, and the Dark Heart will fire explosives and fire tornadoes even when it’s immune. Stay on the move, and get to work on freeing the artifacts from the black goo.
To do so, you’ll need to head to the center of the Cul-De-Sac to find a Tortured Zombie stuck in a fire tornado. Approach it to free it, and bring it to each of the three artifacts. When it’s at an artifact, connected by a yellow line, kill it, and return to the Cul-De-Sac to spawn another and repeat it across all artifacts.
After completing the Concentration Fields step (Kazimirs should be used here), you will enter the final damage phase. Keep running around the map, and only start shooting the Dark Heart when you’re cleared of Shock Mimics and Rad-Hounds.
The Dark Heart has less health than you think, especially when you focus the same weakspot for long enough, as it will take chunks of damage and eventually explode.

- Released
-
November 14, 2025
- ESRB
-
Mature 17+ / Blood and Gore, Intense Violence, Strong Language, Suggestive Themes, Use of Drugs